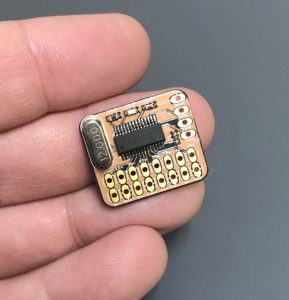
Here is the pre-configured Retropie image and wiring diagram from my PlayStation Classic project. Whether you decide to cut the PlayStation Classic board, create a new board, or hot glue everything in place this will help you achieve a nice installation with working buttons.

5V on the GPIO is only necessary if you are planning to hard-wire the power connection.
The power button triggers a safe-shutdown script so you don’t have to worry about SD card corruption when powering down.
The Reset and Open buttons are both attached to two pins each.
Download Retropie Image : https://drive.google.com/open?id=11e8w6pszSSV0V2FuAtm35rbN-dyduUAI
When you boot the SD card for the first time it may go to a black screen after the PlayStation splash screen. If this happens wait about 30-60 seconds and pull the power from the Pi. After that it should boot fine.
Once you get the system running, make sure to expand the files system to ensure that you have all the space on your SD card available to you. To do this run Raspi-Config from the RetroPie options menu, select ‘Advanced Options’ and choose ‘Expand File System’. Reboot when prompted and you should be good to start adding games!


77 Responses
Please find a way to add a 2tb hard drive so you can have the whole PlayStation pal and ntsc collection in the case.
We would probably need to use a full-sized PSX shell for that!
It might be possible to not wire up the second USB port and instead use it internally https://www.ebay.com/i/382490265119?chn=ps (Or something similar where you cut off the majority of the wire and instead of going to the PSX Classic’s USB port you wire up this thing.) and simply plug in a USB flash drive. You won’t get 2TB without spending an arm and a leg but you can get at least a 1TB flash drive. (link removed)
Assuming there is enough space. Might have to get creative with cutting more of the board away.
There are 4 USB ports on the pi 3, so we still have 2 left after wiring the USB ports. You can add a storage device onto the USB, but I don’t know if I would trust that 1tb USB flash drive for $20. That seems like a fraudulent item, so I’m going to go ahead and remove the link to prevent anyone from ordering that.
Thanks for all your hard work
Do you believe there would be an issue with removing a bit more of the PS board towards the USB ports to allow for a heat sink on the Pi? It doesn’t seem like there would be an issue as that part of the board seems to be dead. Also, thanks for the video on this. I think it was a great idea.
Not at all. Cut it as much as you want!
unreal piece of work here mate, keep up the good work!
Hi There , Great work and so happy to finally complete the project, just a question, it looks like in the Youtube video the Power, Reset and Open buttons are wired closer down the GPIO yet in the diagram they are further up near the 5V power, will I have to re solder the wires to this Diagram as I paused your video and counted the pins you originally soldered to in the video already?
Thank you, keep up the great work!
I ended up changing the Pins from the video. If you don’t want to physically move them to the new pins you can edit the script back to the old pins. To do this go the terminal and type
sudo nano /boot/retrogame.cfgand change the numbers from 17,18,22,23 to 26,6,13,12. Once you changed the numbers save the changes to the document by pressing CTL+O then Enter. To exit back to the terminal press CTL+X. Typeexitto then return back to emulation station.hello it worked everything works just how do i get the roms loaded on the image? via usb does not work and network is due to lack of space. Can you give me some tips?
Make sure to expand the file system. To do this go to the retropie options menu, and select Raspi-config. Once in Raspi-config, go to advanced and select ‘expand file system’. This will make sure that all the space on your SD card is available to use.
Hi, I rebuild this Playstation like you did. This is really great. I have one big issue. After first reboot the USB ports are working. After I pluged in a USB Keyboard for WLan config, I am not able to get the controller work properly. I have no Idea. It might be trouble with USB. I chsnged to the other USB Pins on the Pi, but Same behavoiur. I checked the Connection. Is there a reinstallation of the Driver? Thanks for any hint and your great Job!
Rene
If the keyboard is working through the USB port, then your connections are good. You may need to re-configure your controller. With your keyboard connected, press ENTER (start), select the controller input configuration and press A on keyboard. Go through the steps to set up your controller configuration. Do not edit the keyboard configuration because it has been configured to make the buttons work. If you have any more trouble just leave another comment.
Thanks!
I see how you’re doing the power, reset, menu buttons. But how are you telling pin 8 to send 3.3v when the pi is booted and off after shut down?
That is done by enabling the SERIAL interface in the raspi-config options.
Great job for this PSX Mini case to fit a Rpi 3. Only one thing..is there any possible way to change microSD without unmounting all?
Thanks in advance!
You could use some sort of SD slot extension like this one here https://amzn.to/2Z5djDi
You would have to cut a slot for it somewhere in the shell.
great job!! thanks. will try it later as well.
Hello,
thank you for your work.
ONE QUESTION: How to add more games on the SDcard (with image) and also on a USB key? Please make a manual or a video reference guide. Thank you very much.
I personally transfer roms to my retropie over my network via FTP. But you can also put your roms on a USB thumb drive and transfer them that way. Here’s a link with more information: https://github.com/retropie/retropie-setup/wiki/Transferring-Roms
Hi! I got all the way to playing a game, but now it’s telling me I need to log in. Any ideas what that might be?
Default login is – User: Pi Password: Raspberry
You have to go into Raspi-Config settings in the options and enable desktop auto login. This should already be done in my pre-configured image.
I seem to be getting a low voltage error, the psu worked on both the pi and classic before I started. Any tips what I should check?
Make sure that you are using a good quality USB power supply. This is the one that I personally use https://amzn.to/2S4c85P
download image… “error file damage” 🙁
Are you having problems downloading it, or flashing it to an SD card?
Just bought all the supplies and will be starting to cut and fit the PI into the PS Classic case shortly. One question … do you foresee any heat issues considering there isn’t any kind of airflow in the unit?
I haven’t had any issues, but feel free to add a fan or some other cooling solution to your build.
Hello and great mod…
I have everything setup exactly as you do but the reset does not work properly to exit back to the game menu. What could be the issue.
ThanX!
Please send me an email through the contact form.
Great work really enjoyed doing this mod. But I to have the same trouble with the reset button. And I also soldered a third usb to the board but for some reason it doesn’t work and then the others stop working I grounded it but does it need grounding to the other usb’s? With it been a double usb socket originally
If you have any problems with the buttons automatically triggering without being pressed it means the top two legs on the momentary switch need to be isolated. Just follow what I did in the video and de-solder your wire from the switch, cut the traces going to the top two pads of the switch and then tap the wire onto the pads. If it is still performing its function (shutdown, reset, or open menus) then you need to cut the traces some more until that stops happening. Once it stops happening you can solder your wire back to the momentary switch and you’re good to go. Another possible reason for this, which I mention in the video description on YouTube, is that 5V going to the USB ports on the PSC board from the Pi may be flowing back through the PSC board and causing the issue. You can try slicing the 5V trace from the USB sockets on the PSC board and see if that cures the problem, too. It’s something I thought about but haven’t had the chance to try. If that works please let me know.
As far as your additional USB port causing issues, make sure you’re wiring it correctly. It doesn’t matter where you grab power or ground for the USB sockets as long as the data lines are correct.
The image looks so cool, I don’t have a ps classic, how can I get a ps4 controller to work on this image?
You can connect a PS4 controller to the Raspberry Pi via USB or Bluetooth.
I tried to connect it via usb, it didn’t work. I pressed every button but nothing worked!
You need to configure the input for it before it will work. If you have the PS Classic controller you can use that to press Start and select “configure input” and then go through the configuration process with your PS4 controller. If you don’t have a PS Classic controller, you can use a USB keyboard. Press Enter for start and then select “configure input,” press A on the keyboard and then go through the configuration process with your PS4 controller. It would usually prompt you to configure your controller if there isn’t a recognized controller connected to the system at startup, but since there is a GPIO keyboard program running (Retrogame by Adafruit) to make the console buttons work, the system always sees a controller connected. This is why you don’t get the automatic prompt to configure your PS4 controller. This image was designed with the idea that people were going to be using the PS Classic controllers, which are already pre-configured in the image. It’s not a problem though, just follow my directions and use a keyboard if you don’t have the PS Classic controller.
que trabajo tan perfecto.. me gustaría hacerlo pero soy de Venezuela y no tengo dinero.. de verdad me impresionado el nivel de personas como tu que le ponen un mundo a la mejora de la ps classic gracias desfrute tu video mil gracias por seguir con todo esto..
Love the project and attempted it myself, but I’m having issues with the pi not booting from the SD card. I’m getting power, just no activity. Any ideas?
If it’s just a solid red light check your SD card. You may need to reflash it. I recommend using balenaEtcher.
Hi, excellent work with this, absolutely love it! I’m planning to make 1 but was looking at using a Pi 4B 2Gb. Is your Retropie OS compatible with revision 4? Also do you know if the USB ports on the PSC board would work being connected to the USB3 slots on the Pi?
Thanks in advance.
The image is not compatible with Raspberry Pi 4 and there is currently no official RetroPie release that is compatible with Pi4 either. You will have to hold off for now. As soon as an official release is available I may update the image as long as it is backwards compatible with Pi3.
Thanks for the speedy response. I had a feeling this would be the case as I read they had to make a bunch of changes to Raspbian to deal with the new achitecture in the CPU. Looks like I’ll be using a 3B+ then.
Thanks for sharing this project with us, I look forward to seeing what you come up with next. Any chance there is a NES/SNES mini version on the cards? Or even a full size N64, if you think it would be possible?
Great work here mate, just a quick request if at all possible.
Are you able to upload an image of the ps board with a diagram of sorts showing how much we can chop off safely, I would like as much as possible off to add heatsinks and fans.
Pete
You can cut a lot more than I did, just make sure to leave the mounting holes so you can still screw the board down. Since we’re not making any use of the ps classic board besides its ports you can hack it up as much as you need.
Hey retro! For those of us on raspberry pi 4, could you by chance link how your scripted the power, restart, and open switches to retropie? Much obliged and keep up the good work!
To make custom function buttons I use Retrogame by Adafruit. It converts gpio buttons to keyboard strokes. First you’ll want to plug in a keyboard and set it up through the controller configuration within Retropie. Then install Retrogame and configure your buttons. Since you can only have 1 keyboard stroke per gpio pin, you’ll have to connect 2 gpio pins together (like how I did with the PS CLASSIC). Then, for example, you’ll configure one of the gpio pins to trigger the hotkey and another gpio pin to trigger X (to open retroarch menu) and then attach them to a momentary switch to ground. Here’s the link to the Retrogame installation and configuration page https://learn.adafruit.com/retro-gaming-with-raspberry-pi/adding-controls-software
Hope this makes sense and you can figure it out. I Will try to write a blog post on this soon.
Awesome build I made a slight modification and added a Fan control that takes the Led pin (I’m sure I could use any GPIO pin) as the gate driver for a mosfet and ran the drain to pin 9 and the GND wire off the Fan to the source pin of the mosfet and the power wire from the fan to the other 5V pin 4. No I boot the pi up the fan turns on and when it goes to sleep it shuts off the fan.
Nice! Sounds awesome!
hello, congratulations for the project, I’m trying to run it and I have a problem …… following the scheme and connecting the led lights up but then turns off immediately does not stay on, you know why? other thing …. on the diagram above you make some connections on some pins, instead in the video you use other connection pins …. thanks for the info
Hello Vincenzo,
Is everything else working besides the LED? Sorry the diagram differs from the video, I made some changes before I published the diagram. Follow the diagram, not the video.
hello and thanks for the answer, everything works only the led turns on for a few seconds and then turns off, I checked the voltage on the pin that from 3.3 goes to 0 you know why ?? I can try something.
hello, I solved the problem, now everything works ….. I wanted to ask you just one thing …… in the other emulators how can I make the reset button work to exit the game? thanks
I’m glad to hear you solved the issue with the LED. When I set up the image I created it with making a PlayStation-only Retropie build in mind so I neglected to edit all the other retroarch settings for other emulators. You will need to open to the Retroarch settings in the other emulators and set the hotkey binds to the same keyboard strokes I used for the PlayStation emulator. Take note of the hotkey binds I set up inside the PlayStation Retroarch settings and copy them over to the other emulators. You will need to have a keyboard plugged in to do this. I will set this up by default if/when I ever update the image.
Just wanted to say this is amazing and I’m really looking forward to giving it a try. I am gonna wait for retropie to update for pi v4, cause man does that thing smash emulation! Someone did comparisons on various games across several emulators on 3b+ and 4b, and the average improvement is over 100%. Here’s a link to that: https://amp.reddit.com/r/RetroPie/comments/c7j150/emulation_on_the_raspberry_pi_4_vs_rpi_3/
Thanks a lot! Yeah I’m also very excited for the official Pi4 retropie release! Hopefully it arrives soon.
What gauge and kind of wire are you using? Does it matter what type you use? (Never soldered anything before but I have 3 PIs and 3 playstation classics incase I mess up)
I use 26AWG wire. I highly recommend silicone wires like these here: https://amzn.to/35FEjfa
They are very flexible and won’t melt from your soldering iron. You can also strip them easily with your fingernails.
Love your work, can this be done in a Raspberry Pi case by adding two momentary switches and using your image,
But I still need two controllers. Might be smarter to buy a New PS Mini
Yeah you totally could do that. You can create your own console in any kinda shell like that.
great work!! thanks a lot man
Hi. In the playstation 1 emulator that comes with the RETROPIE operating system, does it contain any settings to enable multitap mode to play 4 players? for example Crash bash, Crash team racing, wwf smackdown 2, fifa, eleven winner, etc.
Greetings from Chile.
I believe it does within the retroarch settings. But I have not used it personally.
so where is the diagram? i just see a link to the IMG file and a lot of comments.
also, am i to correct in understanding that the IMG file is set up to use diff pins than those on the youtube video?
The diagram is the right here on the top of the page. Yes, I ended up configuring the pins on the image differently than in the video.
6 different browsers on 3 different computers beg to differ. disabled ad-blocker and NoScript, even updated chrome to the very latest, and still no pic. checked source code and see no direct link to any JPG JPEG or GIF. the only direct links to pics are 4 PNGs of the logo.
used google-fu to find the pic on a diff page: https://www.retrocution.com/author/admin/
weirdness!
Sorry about that! It should be fixed now. I think my WordPress theme update messed with it.
I saw your video and thought about turning the psc into an Android tv streamer, and then include the emulator as an app, am I being dumb or is it possible?
BTW any chance of more detailed view of where to cut the traces? Because I saw you cut all of them and got confused
You can install Kodi on Retropie and watch movies with it, and then when you quit from Kodi it will take you back to Retropie where you can play games again. I will try to post some more pictures soon.
Worked 1st time for me, Cheers for the wiring guide and image file ???
Just tossing up whether to pi4 an old 7502 spare ps1 now just for the sake of it as there’s more room inside & go completely ott on it or make a bartop arcade with a spare monitor I have lying around ?
Amazing build. I was bored at home due to corona and I tried to build it and worked first try.
But I have one request. I have a Playstation portable that i do not use anymore. While i was building the Classic i thought what if the same was possible with the PSP that i have. If you could make a video on that. It would be super!!
Like!! Thank you for publishing this awesome article.
Thanks for sharing this very good piece of information. Very interesting points too!
Very interesting information!Perfect just what I was searching for!
Howdy very nice web site!! Guy .. Excellent .. Wonderful .. I will bookmark your site and take the feeds additionally…I am satisfied to find a lot of helpful info here within the publish, we need work out extra strategies in this regard, thank you for sharing.
Please,. Sell me one